Tuesday, January 31, 2012

MIRROR, MIRROR ...

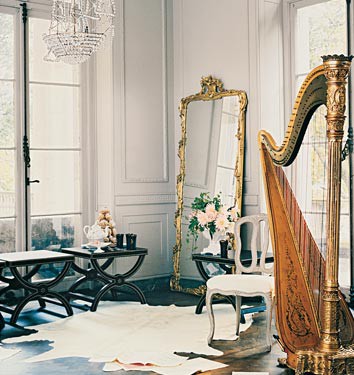
leaning perfectly against the wall! 
Where, oh where can I find one of these gorgeous, french, antique, ornate, gold gilded, beautiful mirrors!?! Well, honestly I can probably find one, but the price would be the issue! So, I re-phrase my question - who, oh who would like to give me one of these for free? Or for a highly discounted price!?


I have been drooling over all these fabulous mirrors floating around pinterest. Do you sometimes think that pinterest teases you by making products you are lusting over pop up more and more on your feed!? I do! And, I know exactly where I would put one of these pups - in our master bedroom. We have an empty corner that could use a big filler object and a leaning mirror seems perfect. But, maybe one day! In the meantime, feel free to lust over these beautiful images too.
 I like how this one is caddy cornered in the room making the biggest statement possible!
 bone inlay gigantic mirror - wow! talk about fancy.


Any suggestions on where to find a reasonably priced leaning mirror!? Please share! I would owe you one!
all sources via my pinterest

Tuesday, January 24, 2012

DESIGN WORK: acoustic soup

I recently designed some marketing for a friend to help promote her organization's big benefit - Acoustic Soup. The event is this Thursday so I thought it was only appropriate to post a few pictures in hopes of gaining a few more supporters. I have heard that this is a great event with delicious soups, fun music, and all proceeds going towards a worthy cause. I am excited to attend for my first time! To learn more about the event or VSA Alabama  please visit their site


To parallel the creative work behind VSA Alabama, I used my calligraphy and watercolor imagery to tie it all together. The bifolds were printed on off white uncoated stock. If you are interested in any design work, please feel free to contact me!

Wednesday, January 18, 2012

STYLISH BOOKSHELVES

Hi all! Happy hump day! Now that the holidays have come and gone, I have new accessories and knick knacks just laying around the house waiting for a home. So, one design essential that I have been particularly seeking out lately is bookshelf styling. Sometimes I can just get so overwhelmed trying to perfectly arrange all my decor on bookshelves. I always feel like they look choppy - so, in an effort to help them look more cohesive, I have been keeping my eye out for inspiration photos and new trinkets to display!


I know I have posted about using yellow national geo magazines to decorate and covering old books, but here are some ways to decorate with variety!


First of all, love this black bookshelf - makes such a statement. And paired with the bold colors of the books and brass trinkets, it is perfection. 
I would consider this bookshelf organized clutter! Against the white walls, all the collected mementos add punches of color to this room and makes the space feel personable. 
Neutral books arranged organically ... but what draws me to this picture is the two petite frames to spice it up.
If you have lots of books and enjoy collecting them, this style may be for you! I am still trying to collect books so I definitely don't have enough to fill a bookshelf yet.
I know this picture has been floating around pinterest a ton, but I can't take my eyes off this one. I love the punches of blue amongst the shades of white and cream and you know I love the gold accents. All the objects are so different and contrast each other nicely that you never get bored.
Gosh ... I do love, love, love this bookshelf! It appears so casually decorated with the stacks of magazines and propped pictures, but someone obviously knew what they were doing. Maybe it is the fun, vibrant colors that draw me to this one, but whatever it is - I wish this could be in my house!
 via lonny mag

Could you color coordinate your books? Again, I don't have enough to do this, but I like this concept. And the gold mirror is such a nice touch!


all sources via my pinterest board

So, those are some of my current favs that I have saved for reference when I begin to overhaul our three bookshelves. They just seem so bland right now, but I hope to jazz them up soon. I am also in search for some more doo-dads to fill the shelves as well. Here are some pieces I have my eye on!
clear quartz votive holder - this would be perfect to place on top of some stacked books or under a cloche.
black lacquer boxes -  I could see two (or three!) of these stacked neatly on a shelf ... maybe topped with the quartz votive holder?
gold gilded blocks - you could spell out your initials, last name, or a simple word and use these as a topper
ceramic zebra - I am so tempted to order this for myself!
ceramic peacock - I like how these ceramic animals can add such variety and shape to structured bookshelves.  
gold gilded mirror - this would be a great, ornate mirror to hang off a shelf like in some of the inspiration images

And of course, beautiful books are easy solutions for decorating!


What are your "go to" places for finding filler objects? I need some new places to scour! Currently I search Anthropologie, Etsy, Zgallerie, High Street Market for unique and vintage finds ... plus some other brand name shops. Please share!

Monday, January 16, 2012

BEST OF 2011

I discovered a sweet surprise last week while back tracking through one of my favorite wedding blogs, Ruffled - our wedding reception was featured as one of their top 15 of 2011! How awesome is that? I was very excited to see this knowing how much time, effort, and creativity was put into making our night special. 
note - for some reason they say "Georgia" wedding in their listing ... !?!?! ... but it was definitely in Alabama!

Although our wedding has come and gone, I still love to thumb through wedding blogs for design and party inspiration. It is amazing how creative some people can be and I love to watch trends evolve. You never know where you will find inspiration these days!

Our first wedding anniversary is less than two months away and I still can't believe how fast the time has passed. Brandon and I have planned a little something special to celebrate the date, but I'll post more about that later. I am anxious to see how our frozen wedding cake has kept over this past year - should be interesting. Does anyone have any advice or suggestions from past experiences? Hope you all have a great start to your week!

Thursday, January 12, 2012

DESIGN*SPONGE BOOK TOUR

A few months ago I had the wonderful opportunity to meet Grace Bonney - the creator and author of Design*Sponge. Grace Bonney is so inspirational and I can say that her blog was one of the first I followed. I have always been a huge fan! A few of us Birmingham gals got together for the book signing and it was such a treat! The signing with accompanied with margaritas before and after which made the night even more fun. Check out these pictures from our big night!
 Abode Love and I getting our books signed! We were like two school girls meeting a celebrity - we could hardly think of anything to say! 
 Me trying to make conversation ... she did love both of our southern double names!
And, my book signed and on display on Melrose's coffee table! Love!
To make things even more exciting, Laurel-Dawn and I were captured in Design*Sponge's collage of her tour of the South! Check out her post here - you have to scroll down a bit to her 'Birmingham' section! So it is only my back and it is a tiny picture but ... I think we are officially friends. What do you think?

Wednesday, January 11, 2012

DIY BRACELETS: revealed!

Welcome 2012! I hope you all had a Merry Christmas and a wonderful New Years! I don't know about you, but it has taken me a bit to get back into the swing of things! Well, over the break I received several emails and comments about Dana and I's DIY bracelet/jewelry project. Remember this "update" picture I shared a while back?
Well I realized I never fully shared the directions of how to make the braided hex nut bracelet. In my original post I just included this simple instructional picture I found via truly smitten:
For those of you curious on how to make this bracelet, I snapped a few photos of Dana and I in the process of making ours. It is hard to braid and thread + work a DSLR camera at the same time so a few are blurry. I apologize, but you should be able to get the gist. 


Here are the supplies:
• Suede or leather cording, the thinner the cording the easier it is to braid
• About 19 hex nuts, we bought ours at a hardware store in packs of 2
I bought my suede cording from our local fabric store (Jo Ann's) and cut three pieces the same length. We measured by wrapping it around our wrists twice and then added extra to compensate for the braid. We then tied all three pieces together at one end in a knot and secured it between books. 

*I made this change after I was finished, but I would recommend sliding 1 hex nut on before you start braiding to help secure your bracelet in the end.
Braid a few inches of the cording until you want to add the hex nuts.
Alternate sliding a hex nut onto the outside pieces while continuing to braid. (slide hex nut on the left outer cord then switch it with middle piece, slide hex nut on right outer cord and then trade with middle piece, repeat sliding hex nuts (left, right, left, right, etc.) on the outer pieces until you have used them all)
Braid a few more inches - equal to the first braid and knot it off again. You should still have enough cording to wrap around your wrist a second time (if you wish). You are pretty much done at this point!


This may be hard to follow but this is how I decided to tie my bracelet off: I slipped the end knot (the one you just made) through one of the braid sections closest to the first knot/before the hex nut; I then wrapped the extra cording around my wrist and decided on how long I wanted it; I tied another knot at that spot and looped the knot over the hex nut by separating the three cords (so 1 cord on one side and 2 on the other).

To remove the bracelet I take the knot off the hex nut and slide it off my wrist. For me, this technique worked out well! Here are some pictures I snapped last night to show an example of the tie off.
We also made these ball and chain bracelets for football season (WAR EAGLE!)and they were pretty easy too. We used the tutorial found on everything fabulous. We plan to make some more fun colors soon! Note - a friend told us the secret to these bracelets, use fan pull chains! It was genius! We searched high and low for ball chain that was long enough to wrap our wrists twice and found nothing. Thanks Jessica and Deidra!
Along with the followers asking how to make the bracelets I posted, I also received comments about other blogger's successful attempts at making their own DIY bracelets. What a fun trend! 


Dana and I are also in the process of perfecting our braided beaded necklaces that have been a big hit amongst our friends. We hope to post some pictures soon and have a few up for grabs! Here is a sneak peek of my favorite one!
Do you have any new DIY jewelry you have found tutorials for or made lately? Please share! I love a new project.